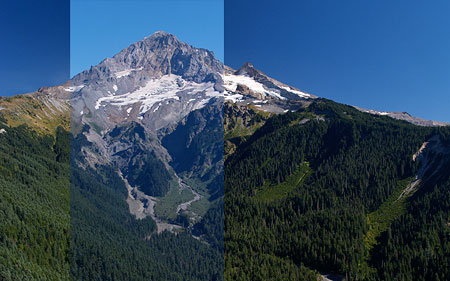
Composite comparison of polarized and un-polarized images of Mount Hood
This is the first in a pair of articles on using a polarizer filter to greatly improve your photographs. It’s something that almost any weekend photographer (like me) can do easily and inexpensively. Polarizer filters are especially important for photographs of mountains, waterfalls and flora. In other words, the very things that we seek out when exploring Mount Hood and the Gorge!
The concept of a polarizer filter is straightforward: it consists of a pair of glass filters that rotate for optimal effect. The purpose of a polarizer is to screen out glare from reflective surfaces — rocks, water, leaves, clouds — allowing the true colors of your subject to pass through to your camera’s sensor (or film).
With a digital SLR, you can fine-tune the degree of filtering with great subtlety, but even with an electronic viewfinder you can still see the effects with many point-and-shoot cameras. Cameras with a threaded filter mount are ideal for using a polarizer filter. Though a bit more awkward to manage, you can even get decent results by simply holding a filter in front of the lens on a camera without filter threads!
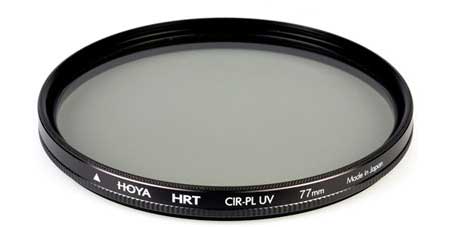
Circular polarizer filter
For digital cameras, you need a circular polarizer (and almost all polarizer filters are now of this type). These include a second stage of filtering designed for digital sensors. You also need to know the filter mount size of your camera threads — printed on the lens with a digital SLR and in the specs or on the camera body for other digital cameras that include threads for attaching a filter.
A consumer-grade polarizer will set you back $30 to $50, with the price proportional to diameter of the filter. You can buy these filters at any camera store, and excellent brands like Tiffen and Hoya are both affordable and widely available in stores and online.
When should you use your polarizer?
Professionals frown on leaving a polarizer on your camera unless you’re using it for a specific shot, as these filters reduce the amount of light available to the camera — and in theory, more glass in front of your lens impacts the quality of your images. This makes sense… if you’re a professional.
But for weekend photographers (like me), it’s just easier to leave them on when you’re using your camera in the outdoors. This is because most polarizer filters (like the one pictured above) double as UV filters, meaning that you can use a polarizer in place of the UV filter that is standard protection for a digital SLR lens. But if you’re shooting in low light, it’s probably a good idea to switch to a UV filter, especially if you’re taking hand-held shots. Simply carry both with your camera if you do need to switch.
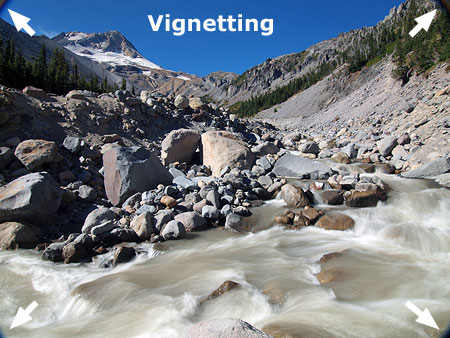
Too many stacked filters left vignetting in the corners of this image of Newton Creek and Mount Hood
You can also attach a polarizer to the outside of your UV filter, “stacking” them. This is convenient, but has tradeoffs. First, three layers of glass in front of your lens could affect your image quality, or even the ability of your camera to auto-focus. Second, the thickness of stacked filters can create a “vignette” effect on your images (see example, above), where the edge of the filters encroaches on the corners of your image. So, it’s usually best to just use one filter at a time, and thus my habit of keeping the polarizer on whenever I’m shooting outdoors.
The following are some tips for using a polarizer in the three most useful situations: mountains, waterfalls (and streams) and flora. Try it, and you will be amazed at your results from this simple piece of equipment!
Mountain Photography
Mountain photography usually involves capturing wildly divergent colors and contrasts. A typical summer scene on Mount Hood might range from bright white snow to nearly black shadows, with a rainbow of colors between. Add reflective glare and atmospheric haze, and what might seem like stunning images out on the trail too often results in disappointment when you get home to discover the muddy, washed-out images that your camera captured.
A polarizer filter does a terrific job of remedying these challenges. Simply attach the filter to your lens or camera, and adjust by turning the outer ring while watching through your viewfinder (or on your monitor). You’ll be amazed at the vibrant colors hiding behind the glare and haze!
While a polarizer can do great things for color, keep an eye on the sky as you adjust your polarizer setting. A polarizer filter has its maximum effect when the sun is at 90 degrees to the scene being captured — in other words, when the sun is directly to your left or right as you shoot. This can result in a unnatural banding of the sky, with an intensely saturated band running vertically at that 90 degree point (see example, below).
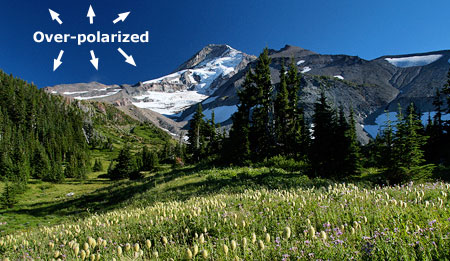
This image of Mount Hood from Elk Cove is a typical example of over-polarizing an early evening image
Over-polarizing the sky is generally a problem when the sun is at a low angle early or late in the day. Unfortunately, this also happens to be the sweet spot for landscape photography, when softer colors and long shadows combine to make for the most dramatic photo. What to do?
The best plan is to compensate for this banding effect by simply dialing back the filter to a point where you’re still getting improved colors, but without overly distorting the sky color. It’s a tradeoff, but worth doing in the field, as correcting an image with over-polarized sky is tricky using a photo editor. In the end, you’ll still have much better colors using the polarizer, even if not to its full effect.
Some before and after comparisons…
Here are some paired mountain scenes, taken with and without the aid of a polarizer filter. The results speak for themselves: better contrast, more intensely blue skies, better mountain colors and more saturated flora and forests. The only difference in these paired images is the polarizer setting!
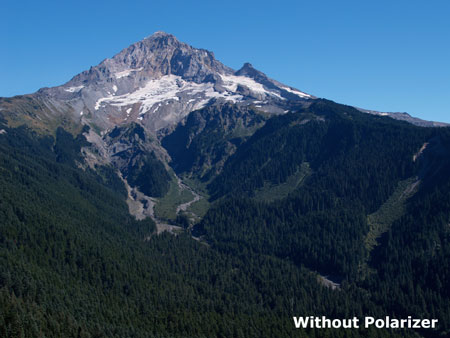
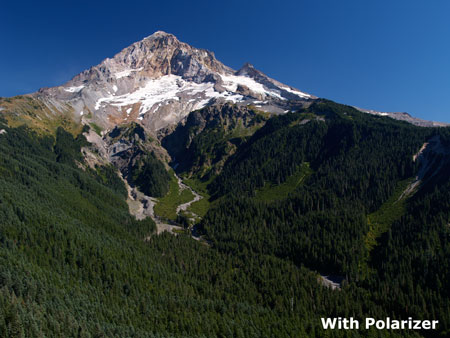
First up, Mount Hood and the Muddy Fork valley from Bald Mountain. Note the improved color saturation throughout:
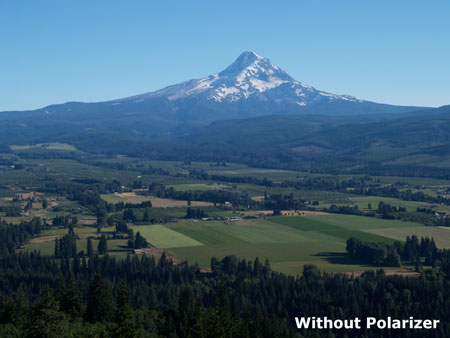
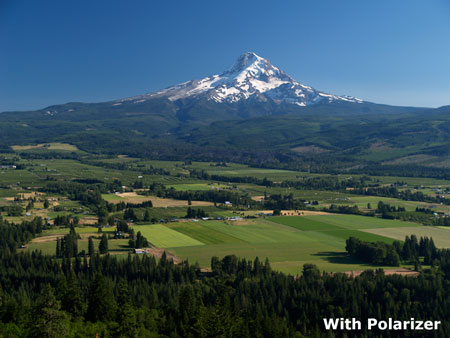
Next, the upper Hood River Valley from Middle Mountain. Notice the improved detail on the flanks of the mountain, where glare hides both colors and contrast on the unfiltered image:
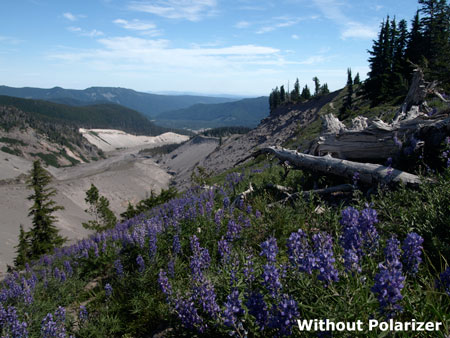
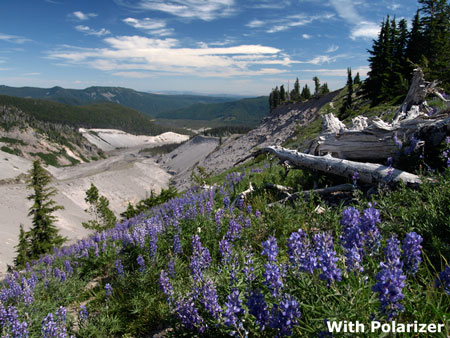
And finally, the White River Canyon. Notice how much more vibrant the Lupine in the foreground are, and how well the clouds are defined in the polarized image:
Waterfall Photography
Where mountain photography is usually best when the sun is shining, waterfall photography is just the opposite. Overcast conditions reduce the amount of glare, and the darker conditions help avoid “blowing out” the bright whites of falling water in your photos. This is especially true when taking a long exposure for that professional-looking, streaked effect.
Yet, even in overcast conditions, the amount of glare reflected off leaves, rocks and water is substantial, and can greatly affect your waterfall photographs. Correcting for glare is easy with your polarizer: simply rotate the ring until reflections from these surfaces fade away. The degree to which you filter out glare is a matter of personal taste, but using your polarizer at the highest setting will produce an amazingly vibrant, striking image.
This 1/2 second exposure of Punch Bowl Falls on Eagle Creek was captured with only a polarizer
Polarizer filters have a dual benefit for waterfall photography, because they also reduce the total amount of light reaching your camera sensor. Normally, this is a minus for photographers, but when you’re taking long waterfall exposures (usually from 1/2 to 1/8 second), a polarizer can take the place of additional light-reducing filters needed to shoot that slowly in daylight. While
Though I carry the additional light-reducing filters, I rarely need them for waterfall photography, as a polarizer filter is generally enough for exposures up to 1/2 second. For most digital SLRs and point-and-shoot cameras a circular polarizer (coupled with a tripod to keep your camera steady) is more than enough to allow you to shoot really professional waterfall images!
Before and after waterfall comparisons…
Here are a couple of paired waterfall images, each scene shot with and without a polarizer filter. Like the mountain scenes, the only difference is the use of a polarizer.
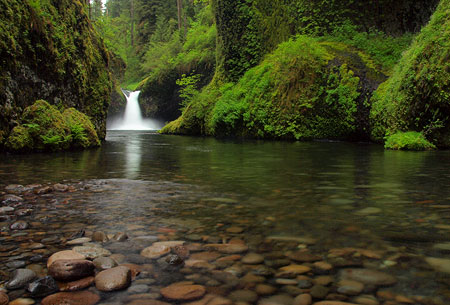
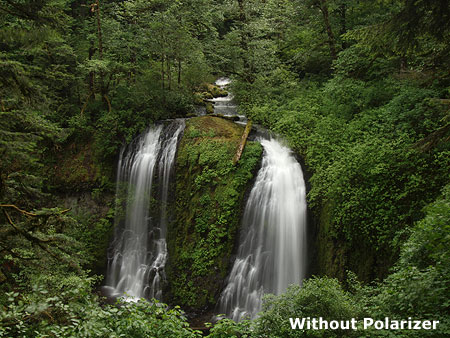
First, Upper McCord Creek Falls in the Columbia Gorge. Notice the difference in reflection from leaves in the foreground and background:
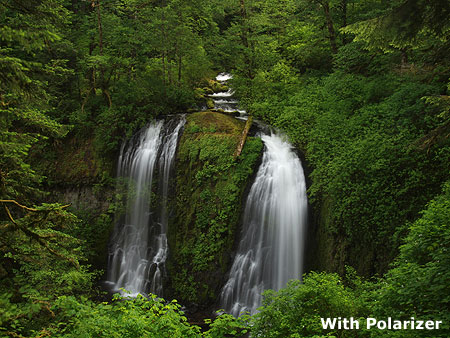
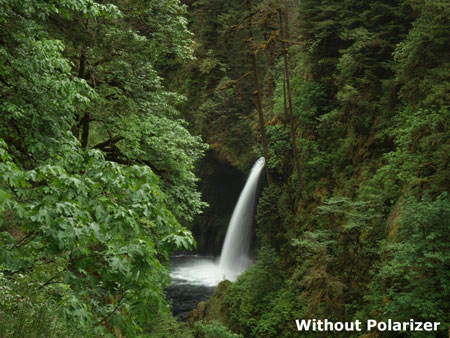
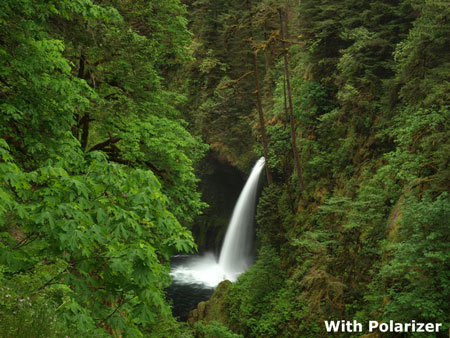
Next, Metlako Falls on Eagle Creek in the Columbia Gorge. Notice the difference in reflection and color saturation on the maple leaves at the left side of the image:
Photographing Flora
If you enjoy photographing flora, a polarizer is a great way to reduce glare and improve color saturation — especially in wet weather, when leaves are shiny and reflective with moisture. Often, using a polarizer filter to shoot flora means using a tripod, as close-up scenes often mean dark backgrounds.
The good news is that you’ll get a much better picture with a tripod! You’ll be able to compose and focus it more carefully, and use a much lower shutter speed than you could otherwise shoot, allowing for an even more sharp, saturated image.
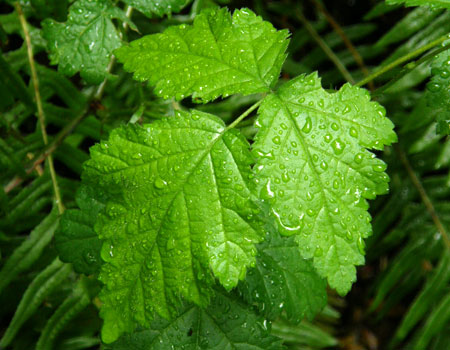
A polarizer allows the droplets of rain to stand out on this very wet bramble leaf, not the reflection of the sky
The trick is to balance shutter speed with wind conditions. In perfectly still conditions, you can reliable shoot for up to 1/4 second without having a blurred subject from wind movement, but in somewhat breezy conditions, you’ll have to adjust to at least 1/60th of a second or faster to ensure that your subject isn’t visibly moving in the exposure.
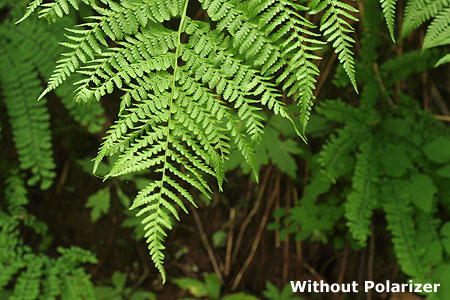
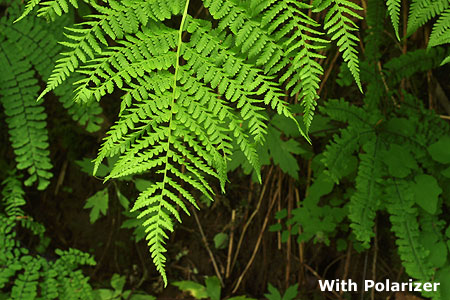
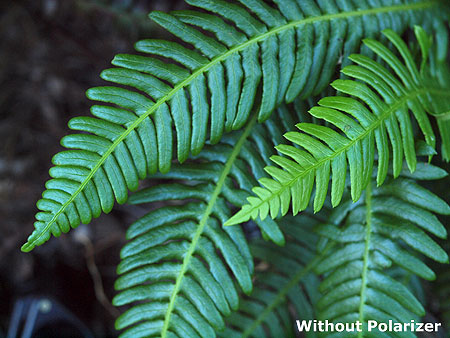
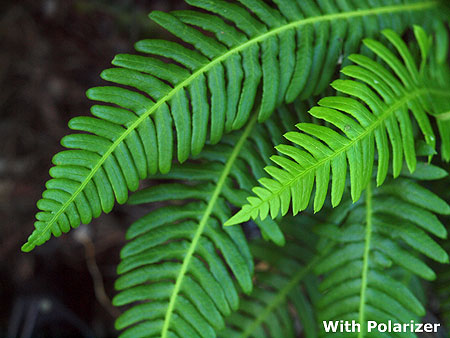
Before and after flora comparisons…
Here are a couple of paired images that show how a polarizer can improve your flora photography. The first is a dry lady fern frond that still has a surprising amount of reflection (the difference in background focus resulted from the auto-focus responding differently to the polarizer settings):
A more dramatic difference is clear in this pair of images showing the glossy leaves of deer fern with and without a polarizer:
When shooting foliage or flora, your best bet is to choose a day with heavy overcast. A general rule of thumb is that if you can see even the most vague shadow of yourself on an overcast day, you’re going to be dealing with glare on foliage that a polarizer cannot fully compensate for.
The following pair of images taken along Eagle Creek in the Columbia Gorge shows the same scene under heavy overcast (May 29) and two weeks later, under bright overcast (June 29):
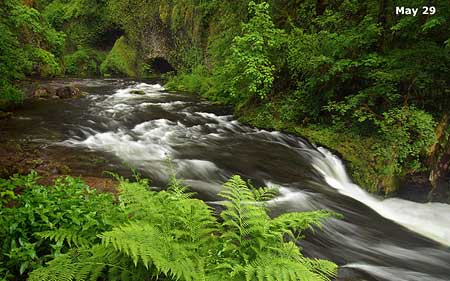
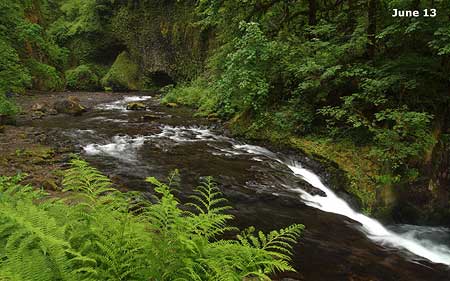
As you can see, the colors in the first image are much more saturated with a lot less glare, You can see the difference in the foliage in the background, in particular. Both images were shot at the maximum polarizer setting and with the same shutter speed.
Hopefully, these before-and-after images have encouraged you to investigate a polarizer for your camera — or giving another try to one that you already have. You will be glad you did, especially if you’ve though about experimenting with a tripod and slow shutter speed photography. Your photos will dramatically improve, and your main dilemma will be where to hang all those great new images you’re going to want to frame!
________________
Next up: a companion to this article will build on the use of polarizer filters in slow shutter speed photography, featuring a virtual field trip to iconic Punch Bowl Falls on Eagle Creek, and tips on getting that perfect photograph!

Pingback: Camera Talk: A Trip to Punch Bowl Falls! | WyEast Blog